
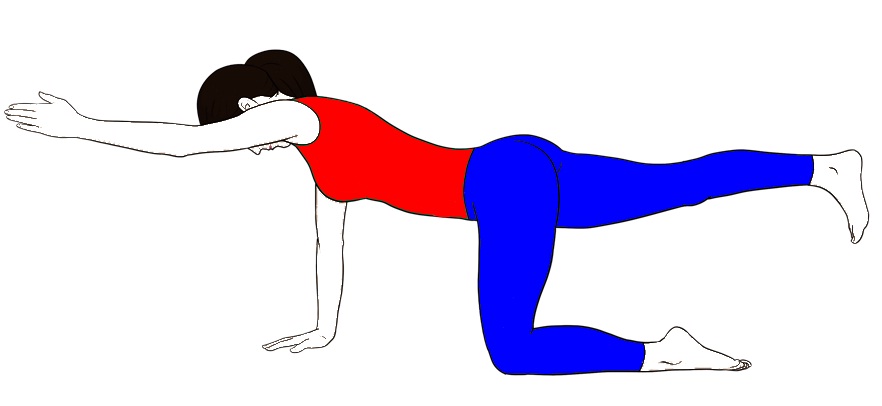
Balancing Table Pose is a hands-and-knees balance in which one arm, one leg or opposite arm and leg extend away from the body. It develops control while the trunk remains steady.
The full opposite-arm-and-leg version is optional. Keeping one hand or one knee on the floor can provide the same alignment lesson with less demand on balance, wrists and knees.
Navigator
Set Up a Comfortable Tabletop
- Place the hands approximately beneath the shoulders.
- Place the knees approximately beneath the hips.
- Use a folded blanket under the knees.
- Spread the fingers and press through the whole hand.
- Keep the back of the neck long and the gaze toward the mat.
Step-by-Step Balancing Table Pose
- Begin in a stable tabletop position.
- Slide the right foot back with the toes on the floor.
- Lift the right leg only to the height at which the pelvis stays level.
- Keep both hands down, or extend the left arm forward when balance is steady.
- Reach through the heel and fingertips without lifting the ribs.
- Take one or two comfortable breaths.
- Return the hand and knee to the floor with control.
- Repeat on the other side.
One-Limb and Supported Modifications
- Extend only one leg while both hands remain down.
- Extend only one arm while both knees remain down.
- Keep the toes of the extended leg on the floor.
- Place the hands on blocks or make fists when wrist extension is uncomfortable.
- Practise with the hands on a chair and the feet on the floor.
- Shorten the reach to maintain control through the trunk.
Spinal, Shoulder and Pelvic Alignment
- Keep the pelvis approximately level with the floor.
- Reach the leg back rather than lifting it high.
- Press the supporting hand into the floor without locking the elbow.
- Keep the lower ribs gently supported.
- Avoid dropping into the supporting shoulder.
- Keep the neck aligned with the rest of the spine.
Common Mistakes
- Lifting the leg too high and arching the lower back.
- Opening the pelvis toward the side.
- Dropping into the supporting shoulder or wrist.
- Holding the breath.
- Moving quickly between sides.
- Continuing after the supporting knee or wrist becomes painful.
Possible Practice Effects
A scaled version may develop balance, shoulder stability, hip control and awareness of the trunk in a neutral position. These are practice possibilities rather than guaranteed therapeutic effects.
Precautions and When to Modify
- Use a blanket, blocks or a chair with knee, wrist or shoulder sensitivity.
- Keep both hands down when balance is uncertain.
- Avoid forceful leg lifting after recent back or hip injury.
- Pregnant practitioners may prefer a wider base and shorter holds.
- Stop for sharp pain, numbness, tingling, dizziness or unusual breathlessness.
Frequently Asked Questions
Must the arm and leg lift together?
No. Learn one-limb variations first and combine them only when the trunk remains steady.
How high should the leg lift?
Only as high as the pelvis can stay level and the lower back remains comfortable.
What can I do for wrist discomfort?
Use blocks, fists, a wedge or a standing chair version to reduce wrist extension.
Related SarvYoga Guides
Practice Summary
Use a comfortable range and stop for sharp pain, numbness, tingling, dizziness or unusual breathlessness. Seek qualified instruction when symptoms persist or individual adaptation is needed.