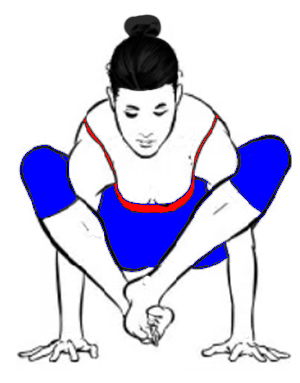
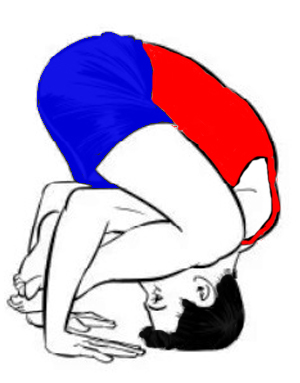
In Bhujapidasana, Bhuja – shoulder/Arm, Pida – Pain, Pressure and the Asana stands for a seat, Pose or Posture. Bhujapidasana is also known as Shoulder Pressing Pose because when you perform Bhujapidasana you feel lots of pressure on your shoulders & in arms.
It means for doing Shoulder-Pressing Pose, you need strong arms as well as shoulders also. When you look Bhujapidasana video or Picture it seems easy but it’s not. It requires more practice, full attention and patience also. Regular practice of Shoulder-Pressing Pose improves your strength, stamina, focusing power and balance.
 Name of Asana: – Shoulder-Pressing Pose.
Sanskrit Name: – भुजiपीडासन
Level of Asana: – Advanced/ Intermediate
Style of Asana: – Ashtanga Yoga
Pose Type: – Arm balancing
Preparatory Poses
Bound angle or Cobbler Pose (Baddha Konasana)
Follow – Up Poses
Standing Forward Bend (Uttanasana)
Navigator
Steps of Shoulder-Pressing Pose (Bhujapidasana)
 Start Bhujapidasana through squatting. Keep your feet little wider but lesser than your shoulders distance with wide knees.
- Keep your Torso (midsection) towards forward and take it between your inner thighs.
- After that, Raise your hips in a way that it comes just near to the ground, during this you have to lower down your midsection.
- Keep your left shoulder near to the back region of your left thigh but little up to your knees. After this, keep your left hand on the floor just close to your left foot (outer region of left foot). Copy the same step to your right side also.
- Doing this step will build your back encircled. Then, from your palms strongly press the floor and try to raise your body by shifting weight on both hands (Center of gravity helps in lifting).
- Next step, you have to press your outer part of arms with your inner thigh when you keep your right ankle over to your left ankle. At that time set your eyes in a forward direction.
- Remain in the pose for 30 to 60 seconds or as much as you can, then bend both elbows. Release your pose by bending your elbows with breathe out.
Tips for Beginners
Shoulder-Pressing Pose is very challenging Asana, so don’t challenge yourself until you become perfect in basic Asana. Once you are comfortable with basic level Asana, and then try this with the support of your sitting bones, bolster or block. At first attempt, it seems hard to get into Bhujapidasana.
Shoulder-Pressing Pose (Bhujapidasana) Variation
Once your master in the Bhujapidasana, you can also perform its variation (full Pose). In the Variation of shoulder Pressing Pose you have to lean forward in a way that your chin touches the ground. Keep in your mind don’t attempt full expression in hustle and bustle. If you think you’re enough preparation for this, and then you effortlessly get progress in this.
Benefits of the Bhujapidasana (Shoulder-Pressing Pose)
- Bhujapidasana stretches & strengthens your shoulders, Abdomen, arms, and thighs.
- Shoulder pressing pose improves your focusing powers as well as balance also.
- Daily practices of Bhujapidasana make your wrists and upper body stronger.
- It improves your digestion and gives an excellent stretch to your abdomen.
- Bhujapidasana is the best exercise for your thyroid gland. It also controls your heart rate.
- Shoulder pressing Pose relaxes your body and calms your mind.
- Beneficial in a headache, mild anxiety and in stress also.
NOTE
In case of wrist, shoulder, elbow, lower back and arm injury strictly avoid Bhujapidasana. High blood pressure people should not attempt Shoulder Pressing pose and those who are suffering from cervical Spondylitis also avoid Bhujapidasana. Use props whenever you feel its tough or take a help from your trainer for maintaining the balance.
Scientific Aspect of the Shoulder-Pressing Pose
As you know that, Bhujapidasana is famous for arm balancing pose. So, it needs mental as well as physical acceptance. If you follow the steps carefully then you can easily perform this Pose.
Breathing technique is very important in every Asana. For this, you have to master in Pranayama coz Bhujapidasana requires being done in one breath at a time.
So, don’t you beyond over your capabilities, perform steadily and slowly. Whenever you feel uneasy or your body can’t support you then stop it. For this keep concentrate and focuses on the Preparatory poses.
If you easily perform Preparatory poses, then it is not tough for you. Don’t break your breathing process during any Asana. When you feel uncomfortable then breathe deeply then hold your breath. We, mentioned in every final stage of Asana is – Hold or remain in the pose its mean be steady in the final stage and hold your breath also.
(Simple living high thinking)

